Wednesday 28 December 2011

motorcycle flywheel

Most dirt bikes made before 1980 had points ignition ( but not all ! ) Most ( but not all ! ) of the two-stroke engines had fixed advance. That means there was no variable advance of the ignition timing. Most of the four-stroke engines had a variable advance. Our main concern is that the spark occurs at the right time when the engine is at full or maximum advance. Most four-strokes, namely Hondas, can be timed in the retarded position. But some, like Harleys, need to be timed in the advanced position. Look in your Shop Manual (you do have a Shop Manual, don't you ? ) to find out.
Mag-Hodaka
The timing marks are set up a number of different ways. Some have the advance and Top-Dead-Center (TDC) marks on the crankcase and one moving mark on the flywheel. Click on the picture to the right, and you will see two markes on the crankcase and the one on the flywheel. This engine rotates counter-clockwise, so the first mark is the full advance mark, and the second mark is TDC. You want the points to open when the moving mark, exactly matches, the full advance mark. This example is an old Hodaka 100cc engine. If you do not know the direction of rotation simply push on the kickstarter lever.
Mag-Honda
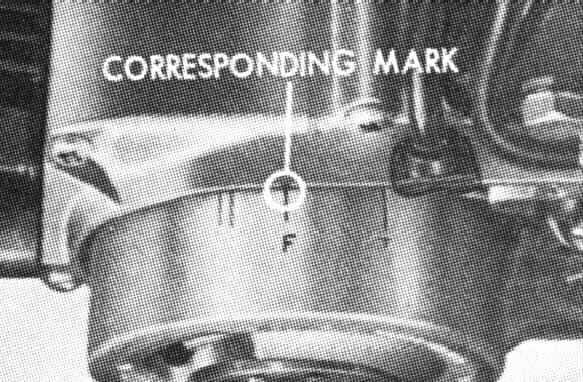
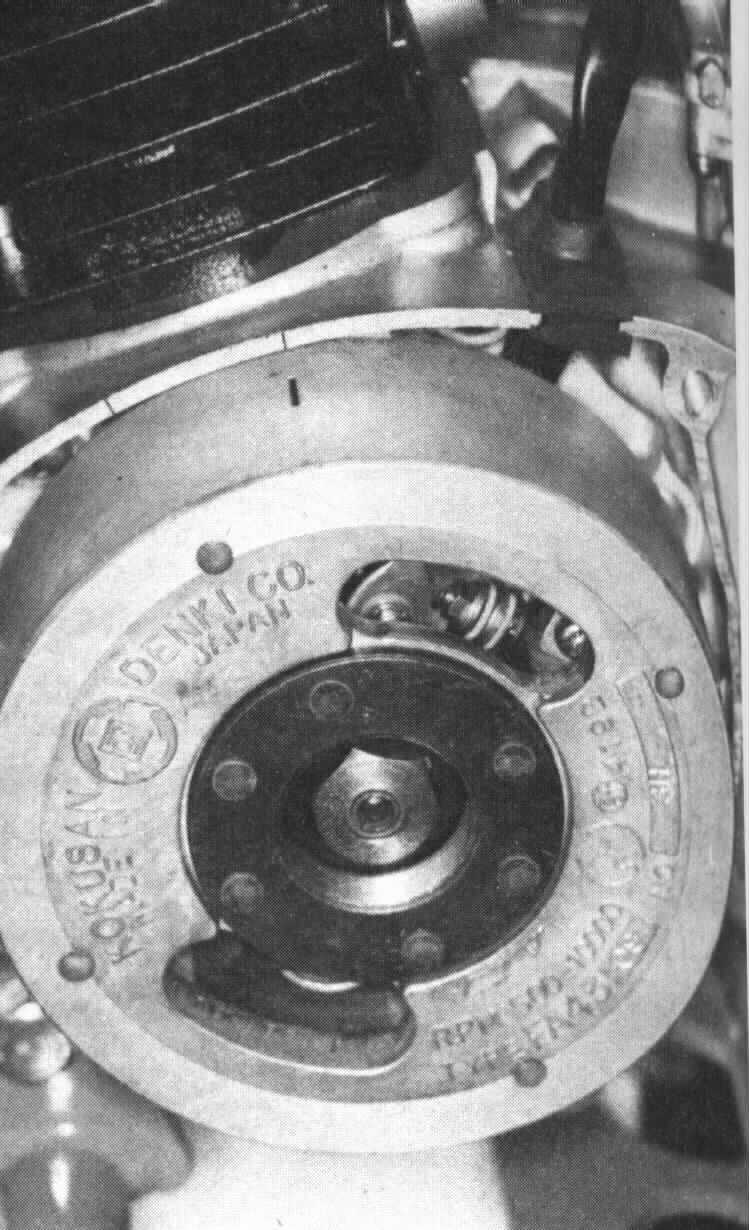
The example to the left has one mark on the crankcase and all the other markes on the flywheel. This Honda engine (50-70cc) is timed in the full RETARED position. This is because it has a centrifugal spark advance. The " F " mark is when the points open and the spark occurs. The " T " mark is TDC. The two marks on the left are the full advance marks. At 3000 or so RPM the spark will occur between these marks. To check this you must use a timing light with the engine running OR with the engine off, physically turn, and jam in position, the advance unit. Then check it. Most of the Japanese engines I time in the retarded position except for the Yamaha 2-stroke singles. They seem to have weak advance springs, making timing in the retarded position iffy. But that's OK...Yamaha was thoughtful enough to put a little hole in the flywheel which lines up with a hole in the advance unit at full advance (a lot of them, anyway ! ). Just put a small drill into the holes to lock it in full advance! Others have a lever you push to get full advance.
points
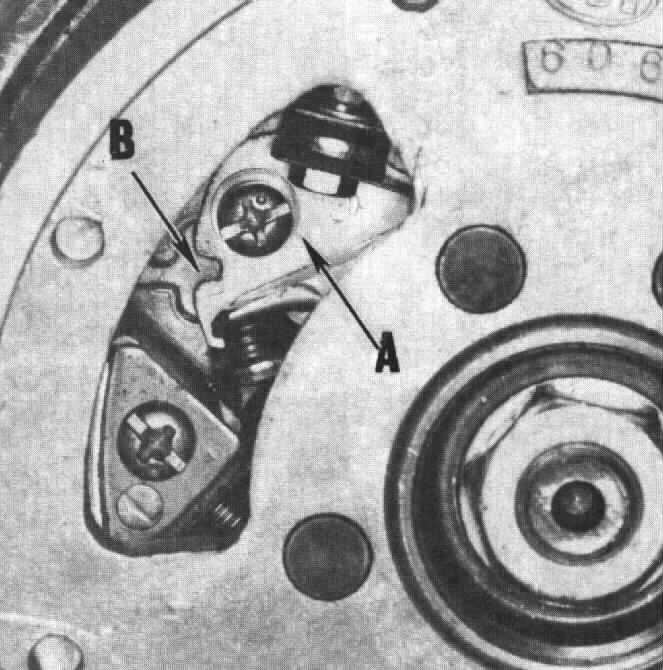
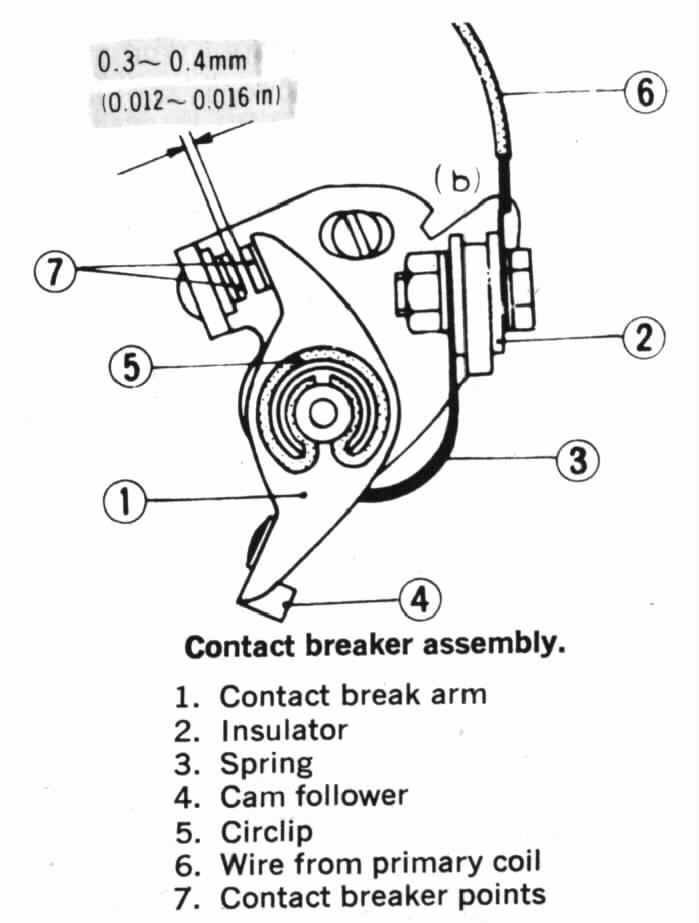
In the picture on the left, you can see " A ", the points and the screw that holds them in, and " B ", the adjusting groove. If you loosen the screw, you can open and close the point gap to set it. It sounds so easy,and it can be... sometimes...and then again, sometimes not. The point gap regulates how much time the coils have to build up the spark. Some systems charge the coil with the points open and some with the points closed. We won't go in to that here. We just want the engine to run good.
Not only must the points open at the right time for the engine, but they must open at the peak of the charging cycle of the coils. As the magnet in the flywheel spins around the ignition stator coils electricity is built up in the ignition coil. When the points open, it disrupts this electric field, causing the spark that fires the fuel/air mixture in the engine. This is usually engineered into the Mag unit and you can't adjust it. If you adjust the points to the right timing, but don't get a spark, it might be because the points cam follower,or heel ( the part of the point that the points cam pushes against ) is worn. Thus causing the points to be out of time with the rotating magnet. The cure is a new set of points. Most of the wear on magneto points is not on the contact points, but on the heel. This is because the voltage across the points is so low, around 1 to 3 volts. Battery ignitions have 12. (yes, some have 6 too) So points that look good can, in reality, be bad.
The spark occurs when the points open. We want them to open when the the piston is in the right position before TDC (BTDC). The mark on the flywheel and crankcase are just tools that allow us to set that opening point-of-time. It is hard to tell when the points open. We need some way to know exactly when they open. I use what is called a "Buzz Box". It makes a buzzing noise that changes tone when the points open. You can also use an ohm meter or a piece of cigarette paper. The paper is actually very accurate. Just put it between the points and pull gently so as not to tear the paper. When the points open the paper will come loose. Remember the timing marks must match when the paper pulls loose.
Another way to set timing is with a dial indicator put down the spark plug hole. Most Shop Manuals give how many thousands of an inch or millimeters BTDC, the piston should be. When the piston is at that spot, say 1.9mm BTDC, the points should open. If you time an engine with a dial indicator there is no need for timing marks, however, if the engine you are working on has no timing marks, you can make your own. Simply make two side by side marks, on the flywheel and crankcase. You can make these marks any where on the flywheel and crankcase but they must match each other when the piston is at the right spot BTDC and the points just opened. Some engines require the removal of the cylinder head to use the dial indicator. more tips

Monday 28 November 2011

Faster Motorcycle

Bolts, nuts, studs, and other threaded fasteners are a vital part of our motorcycles but no one ever thinks about them till they try to take them apart or put them back together. Bolts seem quite simple, but are really very complicated.
I'm just going to cover what you need to know. If you really want to get into it I would recommend reading a book by Carroll Smith called "Nuts, Bolts, Fasteners and Plumbing Handbook". It will tell you more then you will ever want to know about fasteners.
Measure Bolt StretchWhen you tighten a bolt, it acts like a spring. The bolt actually stretches as the bolt is tightened. You can measure this in one of two ways. By how much turning force the bolt takes (Torque) or by the overall length of the bolt (Bolt Stretch). We use a torque wrench to measure the turning force. To measure bolt stretch we use Calipers to measure the over all length of the bolt. Usually, we measure the bolt stretch on connecting rod bolts and compare it to the values given in the shop manual. Not all rod bolts are torqued in this way. You will have to check the shop manual for each engine. You might want to take a bolt and measure it's length. Now put some washers and nuts on it, clamp it's head in a vice and torque the nut to the proper torque figure for that grade of bolt. Now measure it again and see how much it has stretched. Loosen it and measure the bolt. It should have returned to the length you first measured. If it doesn't, that would indicate that the bolt has failed. You might want to torque the bolt till it fails so you can feel what if feels like when the bolt fails (Yields). If you are torqueing a bolt on an engine and feel it Yield, you must replace that bolt !
Metric Bolt GradesBolts are made of different types of steel. The stronger the steel, the higher the torque the bolt can take. The bolt is (Sometimes & sometimes NOT !) marked on it's head with a special mark indicating the strength of the bolt, also known as the Grade of the bolt. A grade four bolt is not as strong as a grade eight. However, that would make it too easy, so bolts may not always have markings or there may only be an insignia for the manufacturer. As you might think, the lower grade bolts cost less then the higher grade bolts. If the bolt is only holding a fender on it does not have to be as strong as the bolt that holds the cylinder head on. By using a lower grade and cheaper bolt on a fender a designer can save money. If a fender bolt fails, odds are you will notice it and easily fix it, no harm done. The flip side would be the bolt that holds the cam sprocket to the cam shaft. These bolts need to be very strong. If they fail, the engine could be destroyed. Because of this difference in strength we need to be very careful we don't use a low strength bolt where a high strength one is called for. Well, duh !
When you disassemble an engine, be careful to save ALL the bolts. I once had a man bring in an XR 250 Honda. Someone had pulled the head and cylinder and lost all the bolts. It would have cost over $100.00 to buy all new bolts. That hurts, seeing how these bolts don't really wear out !
Waisted StudssSome Bolts and Studs, such as those that hold the cylinder head on, are under extra stress. These bolts come in different shaft shapes. Usually they are "Waisted". That is, the shaft of the bolt tapers down to a smaller shaft. This helps make the bolt stronger by channeling the stress on the bolt in just the right way. Also, the head of the bolt can be of a special shape. The shape can be to give more strength or to enable the bolt to fit into a tight spot.
Most all sizes of bolts come in two thread varieties. Coarse pitch and fine pitch. There is no measurable difference in the strength between them or so they tell me. There is one rule for using one or the other. A coarse pitch is used when the female thread will be weaker then the male thread. If the bolt threads into a casting it should be coarse threaded. On the flip side, if the end of the bolt or stud takes a nut they are supposed to be fine thread. All this talk of coarse and strength might make one wonder why it seems all the crankcase screws, you know, the ones that always strip out so easy, seem to be fine thread. I guess they're not. They are 1.0 pitch. Maybe they don't consider those threads to be fine as there is a 6mm-.75 pitch. They sure look fine to me, especially when compared to 1/4-20. I've also checked the threads on studs I've pulled from a number of different motorcycles. Most seem to have the same thread on both ends. I guess someone forgot to read the rules !
Most all male threads are rolled on, not cut. Rolled threads are stronger then cut threads because the cutting of the threads cuts into the grain of the steel and leaves spots where stress cracks can arise. All female threads are cut in. Sometimes you need to cut a few more threads on a bolt or screw. The big problem with that is if you try to cut too many threads, on side of the bolt will start getting deeper threads and the other side shallower threads. I have never traced a bolt failure to a cut thread, but most of my experience is with stock, unmodified, engines. If you are working on modified engines you might want to try to stay with rolled threads.
Theard InformationThere have been all kinds of types of threads and they tell me the best are the British CEI, BSW, BSF, and BA threads. However, no one uses these anymore... go figure !
For a PDF file of Thread Information click


Left and Right hand ThreadsJust to make things interesting, threads can be in right hand OR left hand. I guess the left hand thread can help keep the nut tight if the shaft is turning in the appropriate direction, whatever that is. Actually, I think the engine designers do it to irritate the mechanics. The shop manuals almost always tell you when they throw in a left hand thread. I say most because my example picture is from a DR350 Suzuki. In the after market shop manual I have, I could find no mention of that left hand thread nut in the disassembly instructions. They did mention it at the end of the assembly instructions, kind of as an after thought... just in case you were interested ! If that nut absolutely will not come off, try going in the opposite direction... you never know, it might be a left hand nut. Don't get carried away. It might just be a really tight right hand thread. Ain't mechanics fun !
Sometimes engine vibration will make bolts loosen and fall out. We can come up with all kinds of theories as to why this one came loose and that one didn't but to what purpose ? For a stock machine, make sure you check the lock washer and replace it if it's not in good condition. Metal and Nylon Collar Lock nuts can usually be reused a number of times. They work a lot better then lock washers, but cost a lot more. Some people say the lock washers do not work, but I don't agree. On many occasions, upon removal, I find the nut all scrapped up by the lock washer. Obviously, the lock washer was fighting to keep that nut on !

Friday 26 November 2010

Motorcycle

Metal is not as hard as it lookes or feels. It is always moving. As the temperature goes up metal expands. As the temperature goes down it shrinks.This has advantages and disadvantages. The disadvantage? This changing of size can loosen nuts and bolts. The advantage? It can help us take things apart. An example would be wheel bearings. Most are in an aluminum hub. aluminum expands a lot when heated. So just break out the torch and have at it .. right?
You want to start with gentle heat and if nessesary go up from there. I use a hot air gun. Hair driers don't put out enough heat and boiling water...well..not me. You want to heat the entire object. IF you heat only one part of it whatever it is you are heating can warp out of shape... not good... so move the gun around to evenly heat it.
There seems to be a "magic" temperature(around 250 to 275 degrees). If you moisten your finger and lightly touch it to the hot part you will feel the moisture boil! Yes I really do this, and it does not burn me because I do it very fast ! It can burn you. If you want, try dropping a little drop of water on the part and if it boils off your there. At this temperature bearings will sometimes fall out of crankcases all by themselves or with just a little help. Not only that, the new bearing will usually drop right in if it's been in a freezer for an hour or so.
Notice I use words like "usually" and "might" and "probably" and the like. that is because this level of heat almost always works... almost but not always. Sometimes you have to go to the next level of heat. This would be a propane torch. Very gross but sometimes you have to use it. Remember if you get a part too hot you can take the temper out of the steel making it too soft...Not good. Speaking of tempering, if you heat a solid copper head gasket red hot and then quickly quinch it in water it will retemper it good as new. Won't work on steel head gaskets.